
How to Root Android Phones

Penetration Tester. Developer. Pure GNU/Linux Phone Enthusiast.
This blog will cover how to root an AVD emulator and a physical Pixel 6. But before we cover those topics, let’s cover what it is we will be doing and some of the pro/cons of rooting an Android phone.
First – What is rooting?
Rooting an Android device is a term used for bypassing device restrictions and becoming superuser — often called the “root user,” or just “root.” As superuser, user will have access to system level resources and have greater access on the device.
Second – Why would I want to root a device?
Testing mobile applications for Android usually requires a rooted device. As mentioned above, rooting will give us superuser access on the phone, which allows us to perform actions that make testing easier (e.g. installing proxy CA certificate in system).
The Android operating system is based on the Android Open Source Project (AOSP) (https://source.android.com/), which is the official open-source initiative maintained by Google for the development of the Android operating system. Its purpose is to provide the source code and tools necessary to allow developers, hardware manufacturers, and anyone else to build their own custom versions of Android.
A quick note about the AOSP. The device manufacturer (e.g. Samsung) and the carrier (e.g. T-Mobile) will add to their own updates and changes to their version of Android, so their version of Android on each is based off the AOSP but not a 1:1 match. Updates to Android go through the carrier and device manufacturer before they reach the device. Testing with Google devices bought directly from Google (and not through a carrier) is my recommendation because it is closest to the AOSP.
There are also custom ROMs that a user can flash on an Android device that are different than the AOSP.
What is a ROM?
A ROM is custom firmware that can be flashed on the device. The name is a legacy namesake that is still used. ROM stands for Read Only Memory, which is where the firmware was on older Android devices. The firmware on modern phones is stored in the internal flash memory. ROM is a name that stuck to mean custom firmware.
Examples of custom ROMS:
- GrapheneOS – https://grapheneos.org/
- The team does great work! A privacy focused ROM
- CalyxOS – https://calyxos.org/
- Privacy-based custom ROM
- Fun fact about the Calyx Institute (the team that supports CalyxOS) – They have an unlimited mobile internet solution — (https://calyxinstitute.org/membership/internet). Sharing because I think it is cool 🙂
Third – Bypass security controls (That sounds bad…)
It is. Be careful when rooting a personal phone. (I am not endorsing that you do that and would strongly advise against rooting a personal phone.) If you do decide to root your personal phone, be sure to lock the bootloader after you do what you intended (e.g. installing a custom ROM).
Running sensitive applications (e.g. banking, email client for work) is not recommended on a rooted phone for several reasons. The application is running on a phone where other applications may have access to everything, including the app’s data directory. A couple rules of thumb — always assume the app is not secure, keep protections in place to prevent data loss (e.g. session tokens stored in application’s data directory that another application can access). I could write an entirely new blog/book on this topic but always assume that an application running on your phone wants access to all the data from other apps on your phone (https://techcrunch.com/2024/03/26/facebook-secret-project-snooped-snapchat-user-traffic/). Rooting the phone makes it easier for apps (and attackers) to access information that should not be made available to that app or perform unwarranted actions against another app.
Rooting a phone requires unlocking the bootloader. In short, the bootloader loads the kernel. There are security features that the bootloader provides, including ensuring the code comes from a trusted source. Unlocking the bootloader removes a security control. More info on what the bootloader does can be found here: https://source.android.com/docs/core/architecture/bootloader
Last – There are a lot of tools out there… How do I know a tool is safe?
You need to exercise due diligence when using third-party tools. A good rule for beginners is to stick to the tools listed in the OWASP Mobile Application Security framework (https://owasp.org/www-project-mobile-app-security/). These tools have been vetted.
A word of caution before we begin: Mobile testing has some sketchy tooling and repos available. ALWAYS be sure to use official repos and tooling. Vet the tooling before using. You do not want to introduce bad/malicious code into your environment. Be mindful of the source as forks and copies of tools like rootAVD exist.
Rooting an Emulator
I personally like testing on a physical device for mobile tests, but in Android, the emulator is still a solid choice. Android Virtual Device (AVD) offers a viable platform. We will use an emulator because it is free! Details on installing and using AVD can be found here: https://developer.android.com/studio/run/managing-avds

A really easy way to root an emulator is with rootAVD (https://gitlab.com/newbit/rootAVD).
The TL;DR: rootAVD roots your AVD with Magisk (https://github.com/topjohnwu/Magisk).
Run the rootAVD.sh shell script that is included with rootAVD (or the rootAVD.bat batch script that is included for Windows). You will need Android Debug Bridge (ADB) (https://developer.android.com/tools/adb) installed for rootAVD to work.

The first command that is returned is most often the best command to use. Note that the output has found the AVD emulator and supplied commands to run. The command we are going to use targets the ramdisk image file. The ramdisk image will be modified to give us root access on the AVD. Use the first command in the terminal.
./rootAVD.sh system-images/android-34/google_apis_playstore/arm64-v8a/ramdisk.img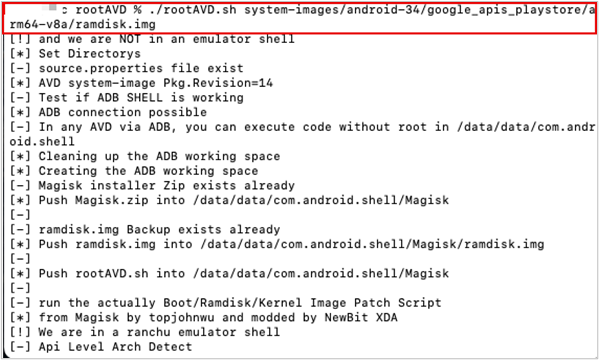
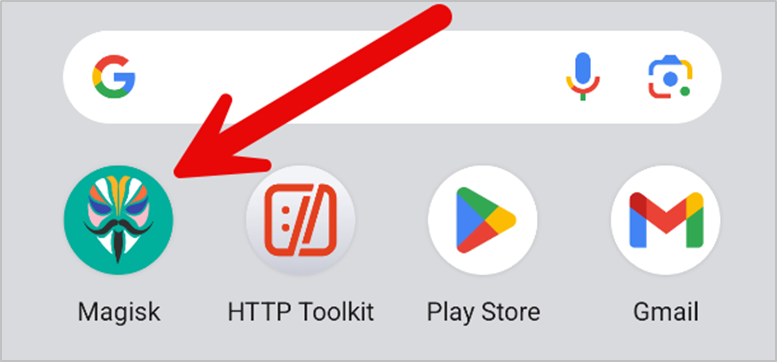
Next, open the Magisk app and it will prompt a reboot to complete setup.
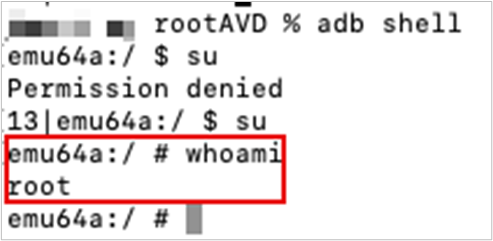
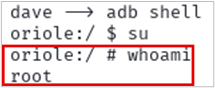
The easiest way to check if you have successfully rooted your device, IMO, is to use ADB to get shell access on the device. Enter the command adb shell in your terminal to get a shell on the AVD. Enter su to access the su binary and grant your shell elevated permissions. whoami will return root if the device has been rooted.
When you first enter the command su, a prompt on the phone will ask if you want to grant com.android.shell root access. Be sure to grant access.
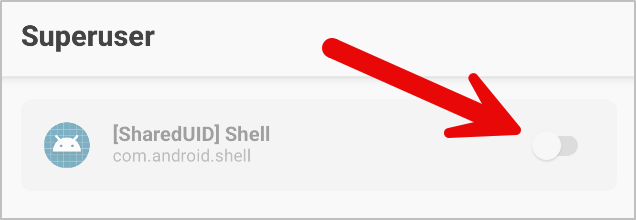
If you missed the ten second window to grant your shell superuser access, not a big deal. Just open the Magisk app on AVD and click the “Superuser” icon.
Grant the process the permission by toggling the field shown in the screenshot below. Because this process requested root access, it will show up in here.
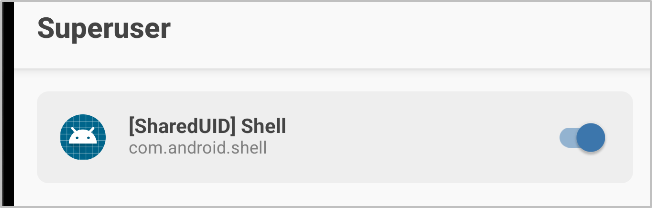
And now your shell will allow you to access the su binary! We can move on to capturing traffic.

Rooting Physical Device
This walkthrough is using a Pixel 6.
First, we need to set the conditions to allow rooting. On the phone, we need to:
- Enable Developer options
- Enable USB Debugging
- Unlock the Bootloader
Developer Options
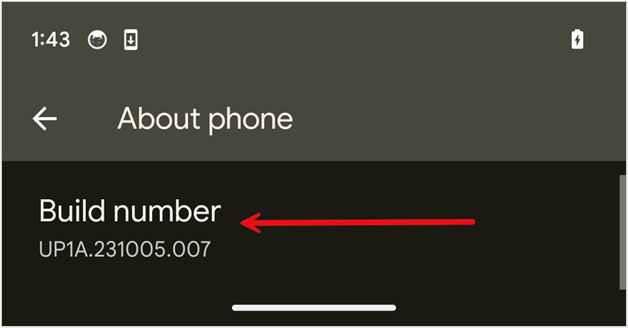
To enable developer options on a Pixel device, go to Settings –> About phone –> keep rapidly hitting Build number (seven times) until you have enabled Developer options.
Developer options can be found in Settings –> System –> Developer options.
USB Debugging
In Developer options, you will need to enable USB debugging. This option lets us interact with the phone using the USB protocol.
OEM Unlocking
In Developer options, you will need to ensure that OEM unlocking is enabled. Toggle the OEM unlocking option to enable.
Sidebar on OEM Unlocking:
- What if you are not able to enable OEM unlocking? If your phone was purchased through a carrier (T-Mobile, Verizon), there is a good chance that this option is not available to you. First, I recommend always getting phones straight from Google or if using a reseller, ensure that device is “Carrier Unlocked.” That said, I have had success by calling the carrier, explaining I am a security researcher, and I need this for testing. I also have explained that I need to run a custom ROM that had Google stripped from it and having Google enabled (and tracking and storing everything about me) on the phone puts me at more risk than having the bootloader unlocked. All I am saying is that it is worth a conversation — the employees are helpful and are willing to hear your case!
Unlock the Bootloader
Once that is done, you need to unlock the bootloader. You will need ADB (https://developer.android.com/tools/adb) to do this. Run these commands.
Word of caution: All information on the device is gone after you do this.
adb reboot bootloader
fastboot flashing unlock
fastboot reboot
Great, we have the phone where we need it. Now let’s start rooting.
Root
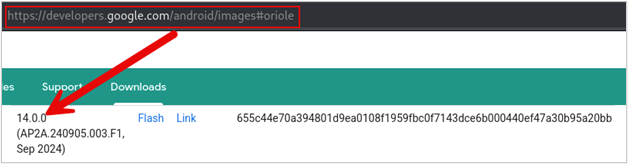
Download the image from here (https://developers.google.com/android/images) that your Android device is on. I am using a Pixel 6 device running Andoid version 14, so I will choose the version in the screenshot. You need to ensure you download the version that is on your phone.
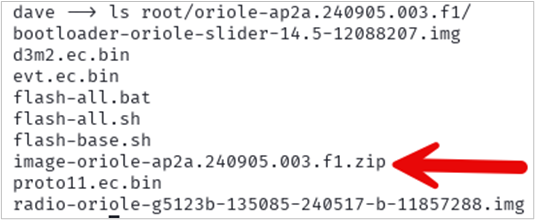
A .zip file is downloaded. Extract the contents of that file.
unzip oriole-ap2a.240905.003.f1-factory-655c44e7.zip -d rootWhen you extract the contents, there is a zipped file inside the contents that you will need to extract to get the boot.img file needed.
unzip image-oriole-ap2a.240905.003.f1.zip -d boot_image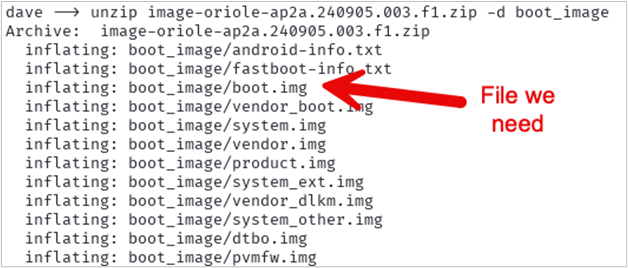
Great! Now we have the boot.img we need. Use ADB to push that file to the Download folder on the phone.
adb push boot_image/boot.img /sdcard/Download/
Now, install Magisk on the phone using ADB. Download the APK file from here: https://github.com/topjohnwu/Magisk/releases

Open the Magisk app –> Select Install –> Choose Select and Patch a File –> Choose the boot.img file you uploaded to downloads.
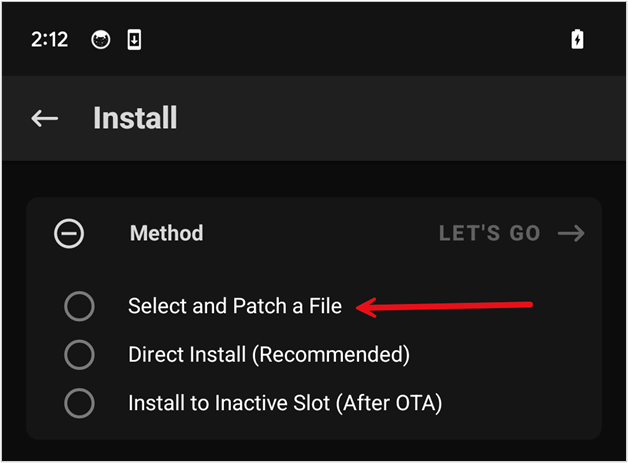
The process creates a patched boot.img file that we can use to root Android. Your file name will be different; make note of the path and file name of the patched boot.img file.

Use ADB to get the file off the phone.
adb pull /storage/emulated/0/Download/magisk_patched-28100_JydcU.img ./patched_boot.img
Once you have pulled the file off the phone, boot into the bootloader.
adb reboot bootloaderUse the following command to get the current slot. The Pixel 6 I am using uses A/B partitioning, so we need to ensure we flash the correct partition.
fastboot getvar current-slot
Slot b is returned in my example. That is what I will use. Use the following command to flash the partition with the Magisk patched boot.img.
fastboot flash boot_b patched_boot.img
Reboot.
fastboot rebootEnsure the device is rooted.
And there it is — the phone is rooted!
In a Nutshell
In this blog, we learned what rooting is, some pros and cons of rooting a device, and methods to root both an AVD and physical phone. Rooting an Android phone is useful for testers as the superuser access is needed to fully test an application or the phone’s software and firmware for vulnerabilities. Rooting also allows for adding custom modifications to a personal phone, like installing a custom ROM. Once a phone is rooted, a tester has full system access and can observe how apps behave and can monitor network traffic in and out of the device. The downside, however, is that rooting a phone weakens security features normally present on the device.
Rooting a phone gives you superuser power over the device and its settings. Useful, to be sure, and dangerous, so use with caution. Happy Hacking!
Ready to learn more?
Level up your skills with affordable classes from Antisyphon!
Pay-Forward-What-You-Can Training
Available live/virtual and on-demand
