
How to Install LineageOS on Your Android Device

Hey guys, my name is Connor. I am a web developer here at BHIS who also loves hacking phones. Particularly, Android phones! Today, I am going to show you the basics on installing LineageOS onto your Android device while providing extra detail and background on the installation process as a whole. Although this tutorial is aimed at installing LineageOS specifically, the lessons taught here can be applied to installing other ROMs for your device.
What is Lineage? Why Lineage?
To understand Lineage, it would be good to first go over a little bit of history regarding Android. Android’s Operating System is an open-source Linux operating system that is maintained by Google. This does not mean that someone can access the OS code for flagship phones such as the Samsung Galaxy, Google Pixel, OnePlus, etc. as they have added closed source code on top of the open-source base Android OS code. This baseline Android OS is exactly what LineageOS takes advantage of. It is a distribution of the open-source baseline Android code that is distributed for a massive number of smartphones. These distributions allow older phones to upgrade to newer Android OS versions without getting a factory update, extending the life of these phones greatly. This open-source version of Android also allows users to root their phones, giving them extra permissions as well as the removal of the Google API from the OS entirely (which is impossible with the built-in OS of most smartphones).
A WORD OF CAUTION BEFORE CONTINUING
Before continuing, it is worth noting that installing a new OS onto any Android device is risky. Data will be formatted during the installation process, which means you should make sure to BACK UP ALL IMPORTANT FILES before continuing! There is also the risk of “bricking” your smartphone. This is when the bootloader is no longer functional and cannot load either LineageOS or the original operating system, leaving the phone in an unusable state. During the installation, the option to not install GApps (Google apps, such as play store, Google Maps, Gmail, etc) will be available If you choose to not install GApps, just know that there will be apps that will not work properly and many that may not run entirely. Due to these potential dangers listed above, it is best to install LineageOS on a smartphone that is sitting on your shelf or in your drawer, and not the current phone you have in use. If you do wish to install LineageOS on your most current smartphone, proceed with caution!
What you need to get started
- An Android smartphone (preferably an older phone that is supported by LineageOS (see the supported devices here) with developer mode enabled.
- A computer/laptop with Android ADB platform tools installed to an accessible directory (should include fastboot as well). We will go over downloading this in the tutorial, so do not worry if you do not have these yet.
- A wire capable of connecting and transferring data between your Android phone and computer. This usually can be a charging wire that is USB to Micro USB.
- A copy of the LineageOS ROM file for your specific device (we will go over getting this in the tutorial)
- A recovery ROM for fastboot. LineageOS offers their own recovery software that we will use, but TWRP is a common recovery ROM that people use as well. If you are already comfortable with TWRP, then feel free to use it!
- .APK files for installing any specific apps that require pre-boot installation (see recommendations below). These are not required to install the OS, but often are wanted by users and must be installed into the system before the first bootup of the OS.
- A can-do attitude!
Recommended (but optional) packages to install:
- Magisk – A systemless root app, that makes granting and revoking super user privileges to apps easy.
- MindTheGaaps – a package that contains Google apps such as play store, Gmail, Google Maps, etc. This is good for people who want the Google apps included with the open-source nature of LineageOS (Note: if your goal is to create a “ghost phone,” do not use Google services).
- Fdroid – It is an alternative app store that carries a decent library of good apps, games, utilities, etc.
Getting everything ready to go
Assuming you have your Android device ready to go, let’s get the computer or laptop set up for this job. First and foremost, we are going to install Android platform tools. These tools include both the Android Development Bus (adb) and fastboot tools. LineageOS has a really good guide on installing the necessary tools. You can also download the development tools directly from the Android site.
Once we have Android platform tools installed, we need to see if adb works. To get adb to work with your Android device, the device must be running with developer mode enabled. To do this, go into the “about” section of your phone settings. Once there, find the build number and tap on it around 10 times until developer mode is activated. If you cannot find the build number, I recommend you Google how to enable developer mode for your phone. Now that you can access the developer options, make sure to enable USB Debugging, and OEM Unlocking can be enabled if your system supports it.

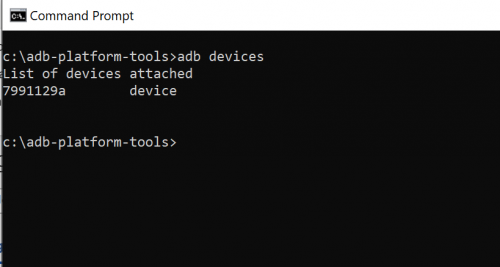
Once this is ready to go, plug your Android device into the computer. There should be a dialog on your Android device that asks if you should enable USB debugging. Make sure to allow it (you can also say “always allow” so you don’t have to allow it every time). Once it is allowed, entering the command “adb devices” in your command prompt/terminal should show your Android device.
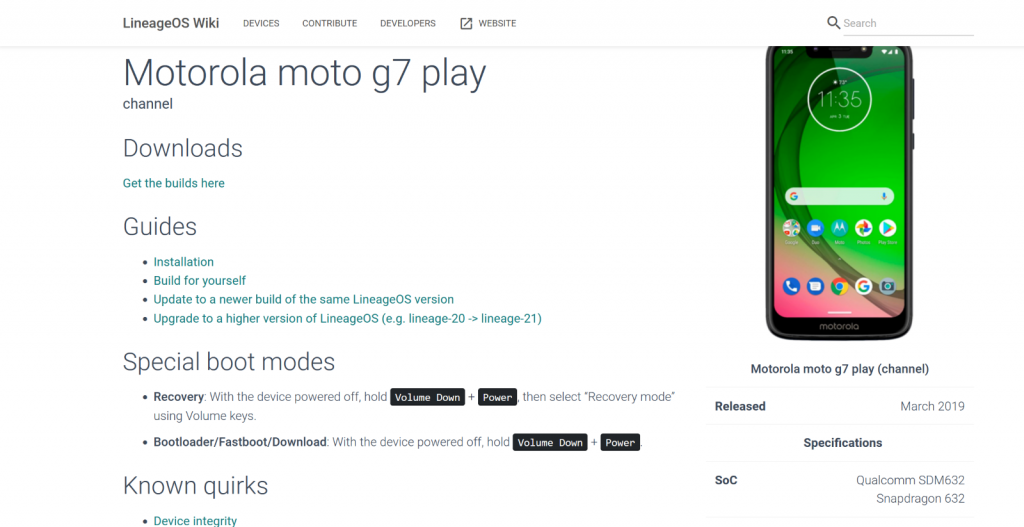
Now that we have adb installed and set up, we will need the ROM files necessary for LineageOS installation. Head to the devices page of the LineageOS site and find your device. Once you see your model, click on it to view useful info such as the special boot modes and how to access them, as well as quirks that are known for your device. Click the “Get the Builds Here” link in the downloads section to get the 2-3 files you need for installation (should be a .zip file as well as a .img file).
Click the installation link to see the step-by-step for your device. I am going to be going over the general steps, but I recommend going through the specific installation guide for your device from LineageOS, alongside this guide (you can access it from the devices page on the LineageOS website). Given that guide is specific for every device, those instructions will be more important than the general guide of this article.
A note on LineageOS official ROM files vs unofficial ROM files: You may notice that LineageOS supports a good number of older devices on their website. Due to the open-source nature of LineageOS, there are places you can go (often XDA forums) that will have links to ROM files that are LineageOS-built to run on an unofficial device. These ROM files often work well enough to get the phone running, with some of the devices garnering a massive number of developers and support. You can, if you wish, use these unofficial ROMs, but you should be cautious, as there is little support for these unofficial builds and unofficial sources could be malicious, so caution is advised. I only recommend using unofficial builds of LineageOS if you know what you are doing and have installed LineageOS before.
Free the bootloader
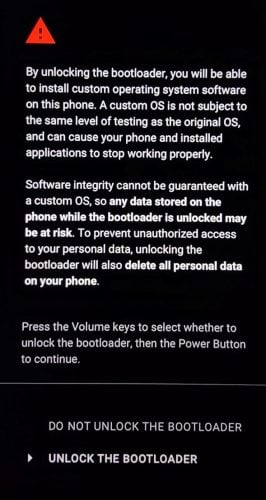
The first step you need to make on your Android device is unlocking the bootloader. This will vary greatly across each device, and I recommend you follow the instructions on your LineageOS installation guide for your specific device. Be warned: unlocking the bootloader will reset your phone, meaning you will lose all data and apps. Make sure everything is backed up before continuing! If your guide does not include instructions on how to unlock the bootloader or a link to a guide, a quick Google search should point you in the right direction. Once the bootloader is unlocked, you can proceed to the next step.
Quick note on adb, fastboot, and the bootloader: Adb is often run when the Android device is booted up and running (the phone is running as normal and not in the bootloader). Fastboot commands run when the device is rebooted into the bootloader. When the device is operational, running “fastboot devices” will return nothing, but typing “adb devices” will show your phone (assuming USB debugging was enabled). Vice versa when you are in the bootloader, so there is no need for alarm when adb does not return anything in the bootloader.
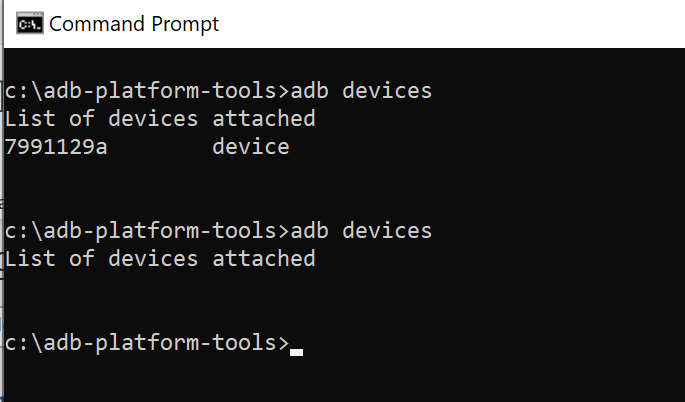
When the bootloader is present, you will not see any devices using the adb command.
Adb will only be accessible during the bootloader process when it is specifically enabled in recovery, but is not needed during the bulk of the bootloader process. The bootloader itself can be thought of as the BIOS of a phone. It is what will load the OS after boot. The reason it must be unlocked is to allow us to make changes to what the bootloader loads upon boot.
A little more in-depth with the bootloader, unlocking, and the boot up process of Android devices in general
The LineageOS wiki will guide you through the process of getting the bootloader unlocked and ready to install the OS, but let’s take a moment before we begin that process to really understand what we are doing under the hood. If you want to continue with the installation process, feel free to jump to the next section.
When the Android device starts up, the low-level code instantiates the memory of the system. Once the memory is set, the code can begin checking the partitions and boot images. If something is off or improperly loaded, recovery will be booted up. If everything passes ok, the boot image begins loading and instantiating. After everything is properly loaded and run, the OS starts up and the user can begin interacting with the phone.
What we are doing when installing LineageOS is replacing the boot images that come from the phone vendor with Lineage’s own boot image. To install this, we must be in the bootloader level. Unlocking the bootloader will give the bootloader permission to install/modify system images and various files. The recovery image that was downloaded alongside the LineageOS image will allow us to install the OS image through the recovery process, as well as other various APK files (we will discuss this more in detail later).
This is where the fun begins… accessing recovery
Now that our bootloader is cleared, we are good to flash the recovery image to the bootloader and truly begin the installation process. There are multiple ways you can access the bootloader, but the two most straightforward ways are through the physical buttons on your phone, and the adb command. Every phone is different in configuration but restarting the phone and holding “volume down and power” together, or some similar combination of buttons, should give you access to the bootloader menu (feel free to Google the exact combination for your device or check the LineageOS instructions for your device). If you have your phone still connected to the PC with a terminal open, another option is entering the command “adb -d reboot bootloader” in your terminal.
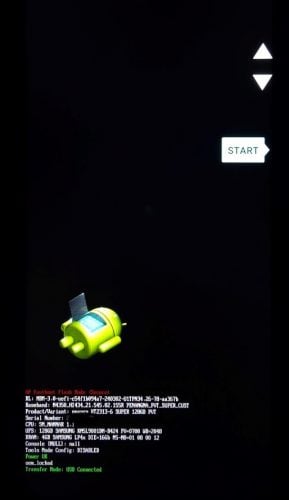
Your Bootloader look may vary, but it should be similar looking to this
You should see the device turn off for a brief moment and restart in the bootloader. For some devices, you may get a warning about the bootloader being unlocked, but you can ignore this message, as that is exactly what we need for installation.
Once the menu is active, try entering and executing the command, “fastboot devices”. You should see your device ID there. If it is there, the next step is to flash the recovery image. When you “flash” an image to the bootloader, you are booting something up that is different than the traditional vendor image. This means instead of booting into the normal OS that is run by the vendor, we will boot into the LineageOS recovery image. Look at your installation guide for your specific device for the exact command, but it should be close to the command “fastboot flash boot [NameOfYourBoot].img” or “fastboot flash recovery recovery.img”. Running this command should boot up the recovery.
Now that recovery is running, we can install Lineage.
Installing LineageOS (And other apps)
Now that we have recovery booted up and running, we can begin installing the actual zip package containing the OS.
NOTE: Please read through this section ENTIRELY before executing any commands, as there are steps that must be performed in order to successfully install. This is the POINT OF NO RETURN. Once you start loading the files of LineageOS, there is no going back!
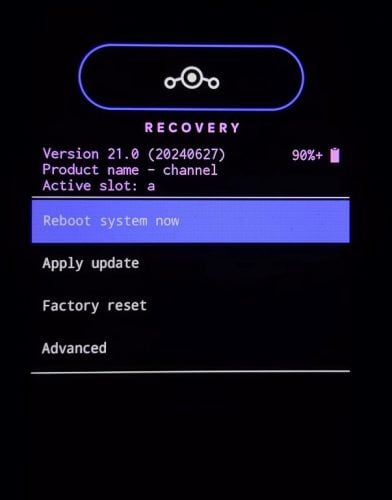
Tap the section of recovery that says, “factory reset”. Choose the option within that menu that states “Format data/ factory reset”. This will remove all data in the system, as well as system files.

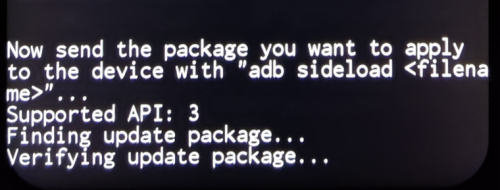
Once this finishes, you can return to the menu and begin sideloading the OS zip file. Sideloading is a term used by Android developers and modders that allows packages such as zip files and APKs to be installed through the adb, rather than the Google Play store or other software store. Select “Apply Update” and then the “Apply from ADB” from the menu. This enables the adb temporarily, which will allow us to run the sideload commands. Make sure to check the exact command in your specific device guide on the LineageOS website, but the command should look similar to “adb -d sideload [filename of LineageOS package].zip”.
Once the install is complete, it may ask you to reboot, but do not reboot if you are planning on installing certain root software such as Magisk or low-level apps such as Google Apps or mind the GAPPS. These apps require installation in this recovery BEFORE the new OS boots up and initializes. You can install all these apps in a similar way by sideloading them through the adb. Tap the “Apply Update” and “Apply from ADB” option that you selected before to turn the adb capabilities back on. From there, you can simply install each desired apk package by typing in “adb -d sideload [package].apk”.”
Once you have installed the packages you like, tap the “reboot system now” option and enjoy your new OS!
Stuck? Need some extra help?
Feel free to reach out to the tool-sharing channel of our Discord!
Ready to learn more?
Level up your skills with affordable classes from Antisyphon!
Available live/virtual and on-demand
